You must be wondering what in the world is Acupressure. Well I am really interested in these Ancient treatments so I came across this one. The idea comes from Ancient China.
Acupressure Points are located around your body and all you need to do is press on those points with your fingers to deal with health/ beauty related problems. It is said that in Ancient China, Acupressure Points were like prescriptions to treat patients. They had herbal medicines but this was a much easier way. Nowadays many therapists use Acupressure and some therapists also teach Acupressure to pregnant ladies for a healthy child.
I am going to tell you some points on your body that gives you beautiful skin. You can have your own spa treatment at home now 🙂 You should massage these points for 30-60 seconds for about 3 times per week
Point 1: The Third Eye
This is the point between your eyebrows and above your nose (the red dot).
It stimulates the pituitary gland, which is the master endocrine gland, to enhance the condition of the skin throughout the body.
Point 2: Four Whites
This point is located 1 inch below the pupil and on the cheek. You should feel the cheek bone too.
This point cures acne and blemishes.
Point 3: Facial Beauty
This point is under your pupils and below the cheekbone. Its basically right under (1 inch below) the Point 2. It relieves acne, facial blemishes, poor complexion, sagging cheeks and improves facial circulation.
Point 4: Heavenly Appearance
This point is located just under the ear lobe and behind the jaw where you kinda feel the indentation.
It balances the thyroid gland to increase the luster of the skin; relieves hives.
Sorry girls I couldn’t find a better picture 🙁
I haven’t tried this massaging technique but after hearing this I really want to. So I will definitely try this and do another post to let you girls know about the results. I hope you liked it. Take Care.
India has all types of people living in all kinds of places from a dusty dessert to tropical forests. And the secrets I am going to share with you all are coming from the era when princesses used to bathe in milk and rose petals which is about.. thousands of years ago.
Indian women mostly focus on their skin complexions, body shape and hair care.
We love to make our hair smell good, keep our skin fair and build curves in our body.
It is said that women in ancient India were praised of their lustrous, long hair and flawless complexion.
So let’s see what they did to achieve what I call the ‘natural glam’ haha
1) If you are on a journey to losing weight, you might want to try adding spice in your diet e.g. chillies. But don’t go overboard. Chillies speed up your metabolism and believe it or not, even models add chillies and other spices in their diet to maintain their weight. 2) Neem leaves were very popular to treat acne and other skin problems. The leaves were crushed to make a paste / face mask or neem oil was used as a cleanser
3) Turmeric was an important spice used to even out the skin complexion and get rid of hyperpigmentation. Make a paste of chick pea flour, turmeric and milk. Add the ingredients until it has consistency like any other face masks. Apply this paste all over your body and massage it in. Wash it out after 10-15 mins.
4) Use cold water as a toner. It closes the pores, improves blood circulation and cell stimulation.
5) As well as neem, onion juice was also believed to fight off acne. Mix some onion juice and honey in equal ratio. Apply it as a face mask and washit after 10-15 mins.
6) Another face mask for acne prone skin uses sandalwood and turmeric powder mixed with yoghurt. This mask has anti-septic properties. It makes your skin smooth, soft, acne-free and even toned. Mix the ingredients until your desired consistency forms and apply it. Wash it after 10-15 mins.
7) Ancient Indian women used Kajal (homemade natural eyeliner). It was made from castor oil, coconut oil, almond oil and black mustard seeds. This made your eyes brighter/whiter, it improved vision and stimulates the growth of eye lashes
8) The main ingredients used for hair care were Amla, Shikakai, Coconut Oil and Henna. There are actually thousands of herbs that were used for hair care but these are the main ones. And I always use coconut oil. I can swear by it. It really does help my hair grow really fast.
9) Ayurveda advises that do not put anything on your skin that you cannot eat. All their face masks are actually edible. Even if I use these natural stuff, I put make up on my skin like foundation. I wonder what it does to my skin 🙁 I will try to use them less often now.
10) Many people think that being beautiful will make us happy but it is really the other way around. You will be beautiful when you are happy from the inside. Try to walk past a crowd of people with a frown on your face or a beautiful smile and you will notice the difference.
The secret my Mum passed on to Me:
It is a face mask. My skin was really bad back then and so she advised me to apply this face mask which actually changed my skin A LOT. I kept ignoring her advice because I used to think it’s an old thing and it’s not gonna work but actually nothing worked better than this face mask.
It was Honey and Cinnamon mask. For more details on this click HERE.I truly want to stop using cosmetics and embrace these ancient secrets. And to be honest, the one that I have already embraced have worked WAY better than anything else. For example coconut oil for my hair, honey and cinnamon for skin and certain diets for body. I will try my best to adapt a Natural Healthy Lifestyle.
Are you willing to do that? Can you give up the cosmetics and embrace Natural ingredients that work like magic? I will certainly try my best 🙂
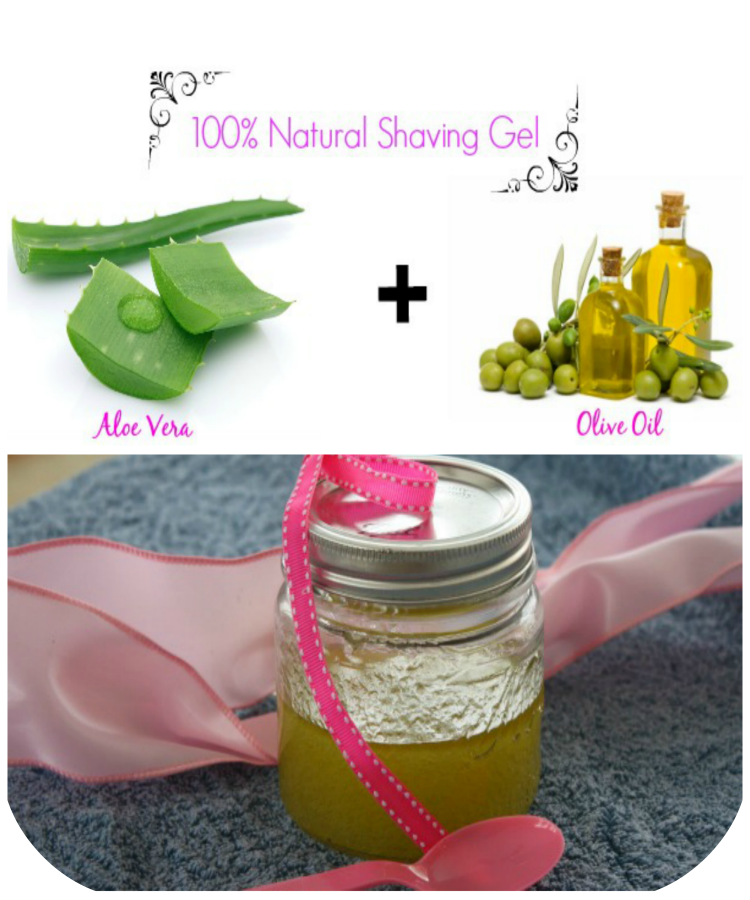
I am so excited to tell you girls about this 100% Natural Shaving Gel that you can easily make at home. It works better than the chemical ones believe it or not. And it is so moisturising for your legs making them flawless. Plus the ingredients used are anti inflammatory which prevents razor burns. Now who wouldn’t want flawless, moisturised and sexy legs. Also if you get razor burns, check out my post on DIY: 7 Tips to Get Rid of Razor Bumps Naturally Read more to find out the secret…
All You Need:
1. A clean jar
2. A Popsicle stick or Small Spoon
3. Aloe Vera
4. Olive Oil
Aloe Vera and Olive Oil should be added in equal ratio.
Now if you want to try this method for once, take 5 tsp of Aloe Vera and 5 tsp of Olive Oil. Mix them in a jar with a popsicle stick or spoon.
Wash you legs with warm water.
Then apply the mixture on your legs evenly and use a razor to shave carefully.
Do this at night so when you wake up, your legs will be super soft and flawless 🙂
After shaving, you can either wash your legs with soap to get rid of the excess gel or wash it only with water to leave the moisture on. Wipe your legs with a towel and have a good sleep. (I usually prefer to wash it only with water).
And ta daa, wake up with beautiful, soft legs. I hope you girls really like this because I totally did and it is really worth it.
Just make sure to wash off the grease from your bath tub in the end because it gets really slippery.
This is a request from my lovely blog reader. If you have any questions or requests, click on the Make a Request tab.
I hate getting those razor bumps after shaving too. So here are some things I tried to get rid of them or prevent them. My skin is super sensitive so I have to be really careful when it comes to shaving or waxing or anything. 1) When you are shaving, go over the area really slow. Don’t rush it because that’s when the things get worse and you get the bumps.
2) Shave at night time so if you get razor bumps, they will be gone by the morning.
3) If you get razor bumps when shaving at night, apply some aloe vera gel on legs. Aloe Vera is anti- inflammatory and really moisturising. So it gets rid of the bumps and moisturises your legs. Thats 2 in 1 thing. And that is why Aloe Vera is my favourite natural thing.
4) You can also apply olive oil if you don’t have aloe vera gel. But honestly, I would prefer Aloe better 🙂
5) Wash your legs with warm water to open the hair follicles. This will make it easier for you to shave and makes your skin less irritant.
6) Shave in the direction of hair growth the first time. It is gentler. Then go over the same area again except this time, shave against the direction of hair growth. Shaving in the direction of hair growth also prevents ingrown hair.
7) Don’t shave everyday. This will irritate your skin. Shave every other day or two.
These tips are testes on myself so I am speaking from experience. I hope these tips helps you girls. So go out there with sexy flawless legs and be confident.
But remember that, Everything has its beauty but not Everyone sees it 🙂
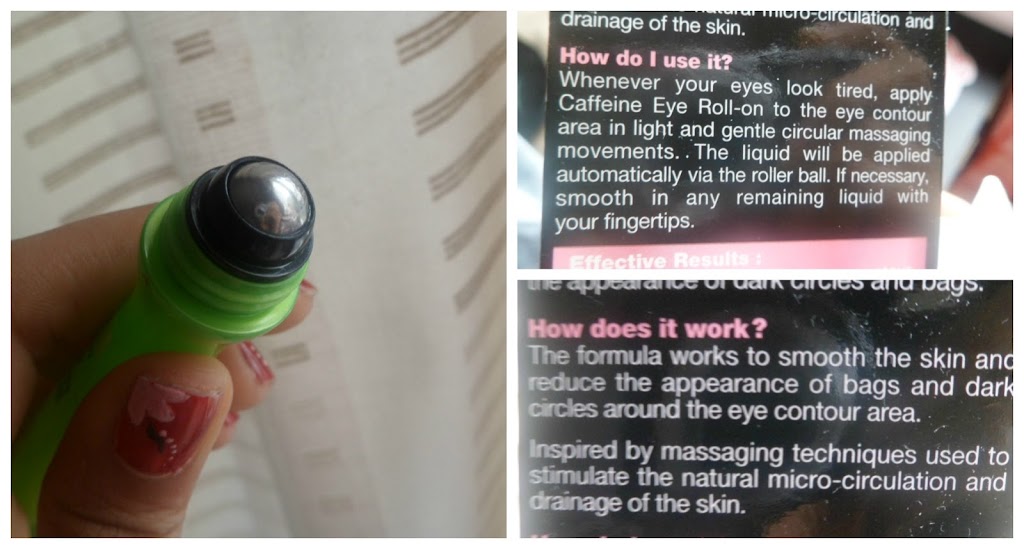
Hi girls. I bought this product like about a week ago and I have been using it every morning after washing my face. So here’s what I think about it.
Pros:
It reduces the puffiness and NOT just temporarily.
The application is precise and roller applies the product evenly.
The roller really massages my eyes and so it feels refreshing and awake.
The packaging is amazing.
Cons:
It doesn’t get rid of dark circles as promised.
It is slightly sticky when you apply it which I hate but it goes away when it dries. I just hate the sticky feeling in the start.
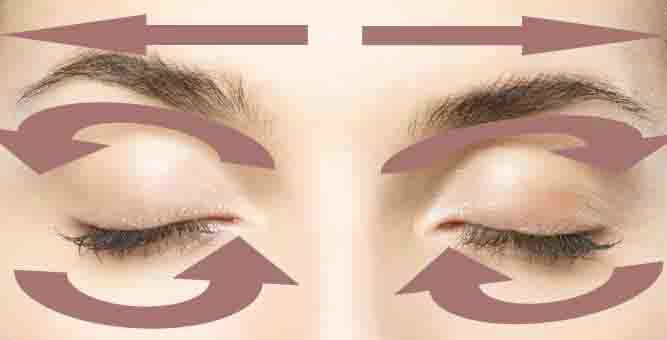
If you use this product the correct way, it will definitely give you the results. And what I mean by the correct way is, the roller should be directed in a way shown in the picture below. Move the roller towards the inner corner of your eyes. This is the way all the fluid under eyes can be carried away to reduce puffiness.
Overall, if you are looking for a product that can get rid of your baggy eyes then this is definitely for you. Otherwise, try out other products 🙂
I got another request from my beautiful blog reader.
“Hey, I come with another request. I want to know if there’s any simple recipe to make your own eye cream at home.” If you want to send me requests, go to the Ask Me tab on top of the page 🙂
Did you know that there are no sebaceous gland which produce oil in the eye area. And the skin is really delicate so you can’t take of makeup with tissues or anything. Otherwise, you might get premature wrinkles.
Personal Experience:
To get rid of puffiness I just massage the area under my eyes towards nose. That way you are pushing the fluids and lymph away from under-eye which makes them puffy.
Eye Cream for Puffy Eyes:
Boil some water in a kettle to make it pure and add some coffee to it. When it cools down, apply this coffee under your eyes when you are going to sleep and wash it off in the morning. This will get rid of the fluids. This is not exactly eye “cream” but creams are too heavy for puffy eyes in my opinion.
Eye Cream for Dark Circles:
Mix 1/2 tsp of turmeric with 1 tsp of lemon. Both ingredients are excellent to brighten the skin. Apply the paste under your eyes and keep it on for 15 mins. Then wash it away but be careful when you pat it dry, it may stain your towel due to tumeric.
Eye Cream for Wrinkles:
Simply dab some almond oil or take some oil from the Vitamin E tablets. Because you have wrinkles, just dab on your chosen oil. DO NOT rub it on your eyes. This helps to rejuvenate the skin and get rid of ageing wrinkles. I would say, just apply before you go sleep and wash it off in the morning.
This is a very simple method to get rid of Cellulite and get healthier skin. I haven’t tried it but I want you girls to know about it and try it for yourself. I have seen a lot of before and after photos on google and people say that it works so why not give it a chance. There’s nothing to lose right? I will definitely try it out.
Our skin is like a third kidney. It releases many toxic materials like sweat and a lot of other stuff. So it needs a little care to get rid of the released materials that lie on our skin. If your skin cannot release these particles, it can result in acne, body odours, rashes etc… I hope that makes sense 🙂
Benefits:
It is more cleansing and eliminating than any other soaps.
It gets rid of all the dead skin cells
Makes your skin more effective so it can easily release toxic materials. When your skin does that, there are less chances of getting bacne, the sweat smell etc…
It increases blood circulation and so it tones the skin. Then you can have that flawless skin without tanning your legs or anything like that.
When you buy a brush, buy the one that has natural fibre bristles. Now this is the reason why I haven’t tried this method. Its because I can’t find a brush with these bristles anywhere. If you girls know where to buy it from, please let me know in the comments 🙂
When you are brushing, use no soap or water. It might feel harsh first, but your skin will adjust to it. If your skin is too sensitive, then start with a dry towel.
Use a different brush for face of course.
When brushing the body, every brush motion should be directed towards the heart.
When brushing face, do it in rotary motions starting from the top forehead.
DO NOT brush the sensitive parts like breasts or where you have an injury or if its infected, irritated etc…
After brushing all over, moisturise your body with any plant oils such as almond, olive, sunflower or use Euro Organic Oil.
Do this everyday and your skin will be glowing. Wash the brush using soap once a week. After washing the brush, let it dry out in sunlight.
I got another request from one of my beautiful blog readers. If you have a question or suggestion for posts, simply click on the Make a Request Tab on top of the page.
“Hey there! I was wondering if you had any good solutions for really, really deep pimples that stay a long time (and often scar). Do you have any tips for getting rid of them fast and preventing any coming on? Thanks!”
First of all I am going to link a video from one of my favourite Youtube Beauty Guru on how he got rid of his severe acne. Click HERE to watch his video. He also suffered badly from acne but now his skin looks so perfect. Maybe this can help.
What I suggest:
1) To cure these type of acne, first use something that can get rid of bacteria and is inflammatory. For this I suggest tea tree oil. It is really good for skin. I actually use Tea Tree Water from Lush. Its 100% natural and it does prevent acne for me.
2) Do NOT use harsh exfoliators with beads that can break your skin. You can use gentle natural exfoliators. Read my post HEREto make your own gentle exfoliator from oats for acne prone skin.
3) Use gentle cleansers such as Cetaphil’s Gentle Skin Cleanser. Or for a natural approach, read my post HERE to make a face mask that is a cleanser, moisturiser and toner all in one.
4) If you have a really oily skin, then don’t moisturise it. I know lots of people still would suggest moisturising skin but I didn’t and so I have clear skin now. Your skin already has so much oil and on top of that you are adding more
So now you have chosen your natural toner, exfoliator and cleanser. If you follow this skin routine everyday, I am pretty sure your acne will be cured. My skin care routine is somewhat like this too and my skin is in a good condition.
“Everything has a beauty but not everyone sees it.”
Give it a try, you have got nothing to lose. Take Care.
Hey girls. Recently, I got a request from one of my beautiful blog readers.. If you girls want to make a request just click on the Make a Request Tab on top of the page.
“Hi, I am so glad I came upon your website. You’ve really helped me out a lot. I was wondering if you could post some DIY recipe to use as a scrub for lips or anything to make lips a little more rosier.”
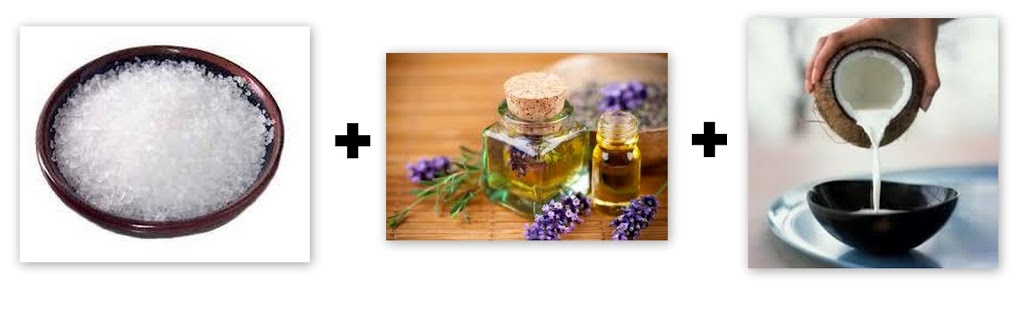
So finally here’s the post. This scrub is not the usual sugar and honey scrub because I don’t like the idea of the huge grains of sugar scrubbing your lips. They might tear the delicate skin. So instead we will use an ingredient with tiny grains because they can reach to the roots and remove dead skin effectively.
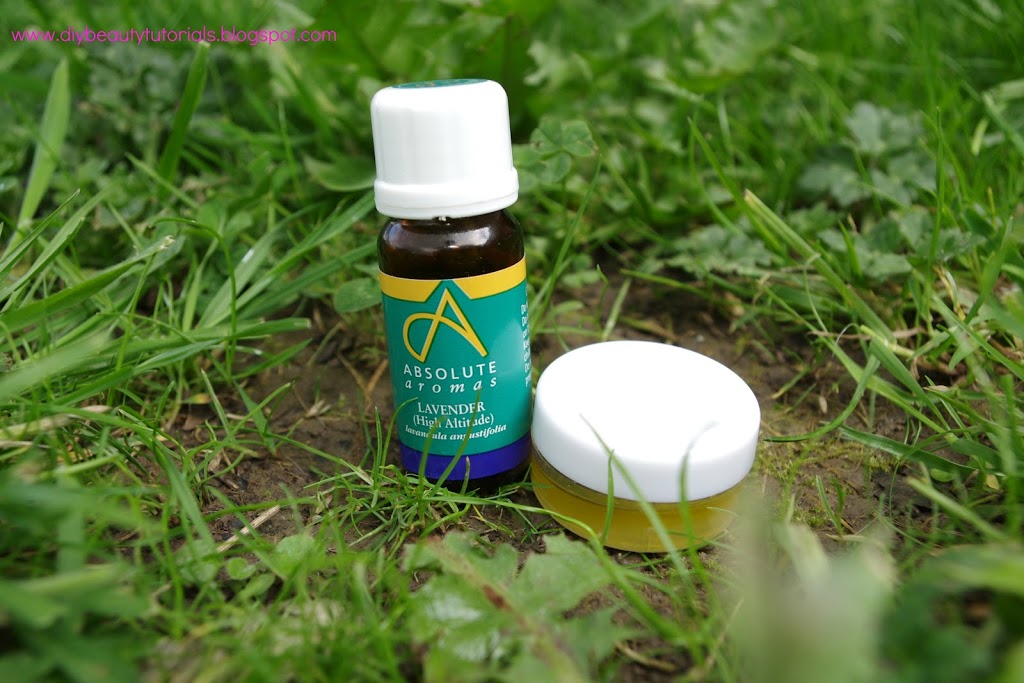
All you need is:
1/2 tsp Sea salt 2 tsp Coconut Oil Essential Oil (optional). I used Lavender essential oil.
Sea Salt is a great exfoliant and the one I have is 100% pure but it had large grains. So what I did was I put some Sea Salt in a blender and turned it on for ONLY 10 seconds. They should be the size of grains of table salt. The reason you can’t use table salt is because its processed and it has lost all the sea minerals. Click HEREto check out my post on Lush Ocean Salt Exfoliator.
Coconut Oil is an excellent moisturiser. So this scrub exfoliates as well as moisturises giving you rosy pink lips 🙂
And finally Essential Oil leaves your lips with an aroma.
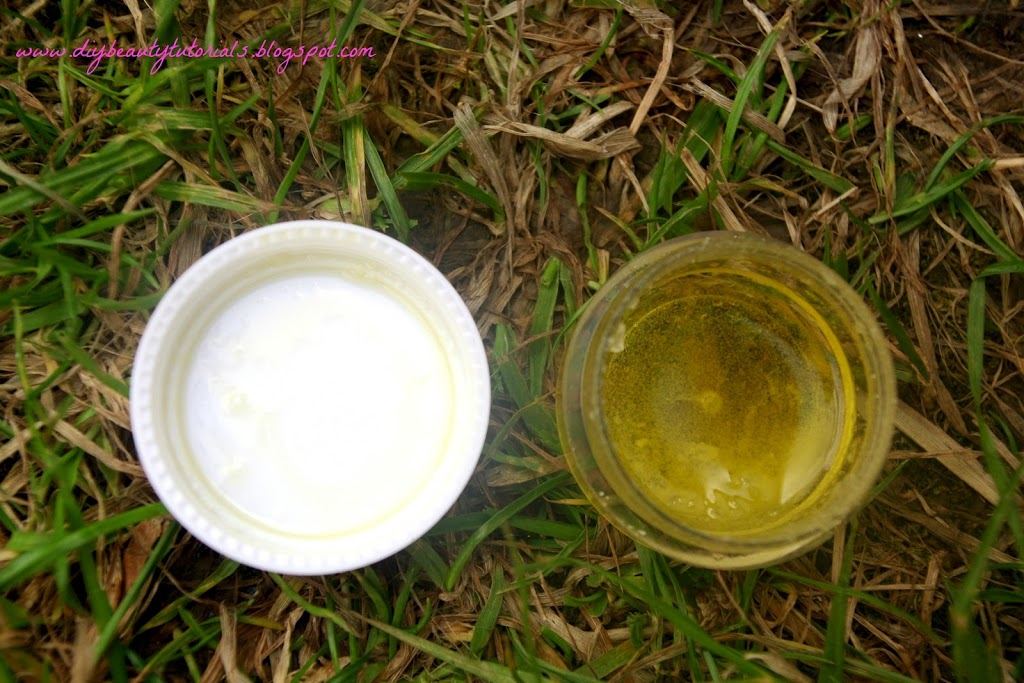
Mix the ingredients and apply generously on your lips. Scrub it in circular motions keeping your lips closed because you don’t want to eat this stuff.. right? Keep scrubbing for a min or two. Then Wash it off with soap and put some Vaseline on to seal in the moisture. You can’t see the salt in the picture beside maybe because of the lighting. But that’s how it really looks.
Well, because I am Indian I have brown skin and so I don’t get much redness. But so many people requested me to do a post on this topic so I put a little research and I gathered all the tips and tricks. From my research some people say that oily skin might cause redness. But before you jump to any decision, please check if your skin is oily or not. Keep reading if you want to treat it au naturelle.
1) Anti-redness Mask:
Oatmeal and Milk Oatmeal has anti inflammatory properties which can reduce redness and we use milk because it calms aggravated skin plus it works as a gentle exfoliator due to lactic acid.
2) Hypnotherapy:
Yes, I know it is a fancy name but trust me all you need for this is your mind and body. It has been proven scientifically that if you can control your body with your mind, then you can prevent redness, blushing, sweating and many other problems. You can start with yoga.
3) Diet:
Avoid hot spicy food.
4) Make up Solution:
Use green coloured concealer which cancels out the red colour of skin. But be careful using these products. Usually I wouldn’t recommend anyone to put make up on but if you don’t have time then you can use this short cut.
5) Most Common:
And you girls may have heard of this a lot but lets just say it once more: Drink lots of water. I hear this a lot and it seems to be the solution of everything so why not give it a try. It can solve most of your skin problems.


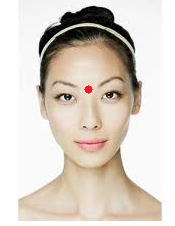 This is the point between your eyebrows and above your nose (the red dot).
 This point is located 1 inch below the pupil and on the cheek. You should feel the cheek bone too.
  This point is under your pupils and below the cheekbone. Its basically right under (1 inch below) the Point 2.
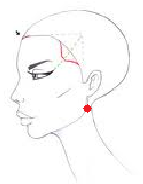 This point is located just under the ear lobe and behind the jaw where you kinda feel the indentation.